Feb 28, 2011

Free Tutorial - Zebra Cane in Polymer Clay by York Avenue Studio

Zebra Cane Beads by York Avenue Studio


I find it amazing that something so gorgeous and in demand, like a Zebra Cane Tutorial, is very hard to find on the internet!!  There are some zebra canes pre-made for sale, beads for sale made from canes, and for a fee, you might find access to a tutorial, maybe.

I started to think that maybe there is a conspiracy amidst the polymer-clay-ers not to share the zebra without membership.  Hmm.  I am new to polymer clay and must be over-thinking this....

Well, I'm going to post a Free Tutorial for a Zebra Cane in Polymer Clay, no coupon code needed, no membership fee or registration!

After having so much fun making my first cane ever recently, I decided I wanted to try a Zebra Cane.  Since there wasn't a free tutorial to be found, I delved in and made one up!  Maybe it was beginner's luck?  It worked!

I hope you enjoy this tutorial and have great success making Zebra Canes in polymer clay!

By the way, if you happen to find another tutorial for Zebra Canes that is free online, leave a comment!  I'm still thinking there must be a "silence pact" so we newbies have to pay to join in!  Actually, I've found the polymer clay community very friendly and warm, so please don't pay any mind to my suspicions.

Simple Zebra Cane Tutorial for Polymer Clay by York Avenue Studio

With the Zebra Cane, you will be stacking layers that are equal in length with different widths.  The overall width of the stack will determine how long your stripes will be.  I made a simple, easy Zebra but you can make an elaborate Super Zebra with these basics, then add your own creativity.

Simply stacking layers of alternating black and white will give you a bar code stripe, not very much like a Zebra, but a nice general start.  This is what I had in mind when making this cane.  I kept it simple with some variations.

1.  Condition some white and black polymer clay and divide into lumps.  I use Premo brand and knead the clay in my fingers.  I am only making a small cane so I used a small amount of clay.  Divide an almost equal amount of each color into lumps, as each black lump will be a stripe and each white lump will be a stripe.  Make several, depending on your style preference.  I like bigger black stripes, you might like thinner black and larger white, etc.


2.  I start out with one black lump and roll a log.  The length will be the cane length.  Then flatten the log, not perfect, as stripes tend to be wider then thinner.  The flattened piece is the length and width of your cane.  If you want it longer or wider, adjust now.  I made a short, skinny cane because I was testing the method.  I've learned that once you make a great cane, you wish it was bigger!  This one was great but ran out fast!

In the photo below, I've made the first flattened black piece.  I've also started a second black piece, which brings us to the next step.


3.  Make a second black log about the same size as the first and flatten.  Try to make them at least the same length.  I ended up trimming mine to match.  Lift the second piece and place it on the first, lined up length wise with the first piece, but off center about 1/3 of the width.  Some of the strip will overhang on one side. Don't press yet.

4.  Make a white log the same length as the black strips and flatten.  Lift the top black layer holding the edge hanging over, leaving the other edge attached to the first layer.  (It will look like an upside down capital T.)  Take the white layer and line it up length wise with the black layers on the side you are lifting.  The white layer goes on top of the first black layer.  When the top black layer is placed back down, it should cover the white layer.  Any clay that hangs over can be trimmed off and used later.


First black layer with second black layer lifted up, like upside down T


White layer gets tucked beneath the two black layers
5.  Another white layer goes across the top, full length and width of stack.

6.  Another black layer goes across the top, full length and width of stack.

7.  I added a black layer on top of the last black layer and tucked another white layer between, just like steps 3 & 4.

Once you are finished layering your stripes, then trim the extras on all four sides and shape the stacked sides nice and flat, working the layers gently so they are pressed together.

Time to slice and see your creation!

I used the extras and lined them up length wise and rolled them into a log, folded the log length wise and rolled again into a log.  This junk cane actually turned into a nice coordinating mini zebra pattern that I used to fill in spots on my beads.  It almost looks like a Toile pattern on the back.

To make my beads, I used some junk clay as a core and used slices from my Zebra cane to cover the outside.  I positioned the slices just so which helped the pattern appear to continue on.  I used my fingers to work the slices together and a round toothpick as a mini roller to smooth the seams.


Zebra Cane Beads by York Avenue Studio


Zebra Cube Charm Necklace by York Avenue Studio - Front
Zebra Cube Charm Necklace by York Avenue Studio - Back
Zebra Stripe Copper Post Earrings by York Avenue Studio


Kathy

Feb 25, 2011

Pearly Sea Scrolls Necklace - My First Attempt at Polymer Clay Beads

First Beads made with First Polymer Cane

I am speachless!  Seriously, I had no idea polymer clay could be sanded and polished.  I was always turned off by the matte finish, the imperfections, the "dollar store" look of anything I had dabbled in.  I made pen covers with the kids that were fun as a craft.  No idea that it wasn't done and the finishing would bring the piece to life.

I'd seen shiny polymer pieces, cute little mini food, cupcakes, fruits, but thought they were just dipped in clear polish.  I even saw tutorials on what gloss to dip them in and about air bubbles, etc.  I wasn't interested.

I am shocked and super excited!  I am experienced with polishing silver jewelry settings and know how to be maticulous and patient and get high shine results in my metal jewelry.  I had a pre-concieved notion that if I sanded polymer clay, it would be scratched, like sand paper on a formica counter or a scratch in plexiglass.

I am so eager to show off my first polymer pieces made from my first ever cane!  As I sanded the pieces, I felt the smoothness right away, but also saw the dull, powdery look and wasn't sold yet that this would be what I wanted.  I went from 400 grit to 600 grit to 1200 grit to 2000 grit.  Very smooth feel to the pieces, but not pretty looking.

Then it happened!  I plugged in my rotary tool and started to buff.  Voila!  Each piece became so shiny as if it was wet!  Wow!  I love it!  I also see where my sanding wasn't complete and my forming of the piece in the smushy clay stages shows my inexperience with blending seams.  But, I've polished rocks in my tumbler in the past and the natural imperfections looked just the same after polishing, like creases and crevices in rock.  Rock tumbling takes 4 weeks to polish, and I only spent about an hour on the clay beads!


Pearly Sea Scrolls Necklace by York Avenue Studio
Here is my creation with my new shiny polymer clay beads!  I really love the white swirls outlined in black.  The navy blue and brown swirls show better in person.  This design idea would look great with a nice navy suit and white blouse!  Black suit, brown suit, gray........


Pearly Sea Scrolls Necklace by York Avenue Studio


In my design I've added silver spacers around the pendant hole and at the top and bottom of the cylinder beads.  The bail is wire wrapped and hooks from back to front with a button half drilled pearl as a stopper.  I used freshwater pearls to string the necklace.  I really like the little connector that the pendant hangs from.  I stamped the back with my new logo stamp from the Charm Factory!


Pearly Sea Scrolls Necklace by York Avenue Studio


All this time these parts and supplies were just sitting in my craft boxes and just a bit of inspiration from my blogging friends, I was able to make a beautiful necklace for myself at no cost!  Amazing!

Hope you like my first challenge with polymer clay.  I'd love to hear your comments!
Kathy

Feb 24, 2011

Bracelet Giveaway Beads By Laura: 'Candy Cupcake'

Here is your chance to win a Giveaway!  Hurry to enter, ends Feb 25th!

Giveaway hosted by:

Beads By Laura: 'Candy Cupcake' Bracelet Giveaway: "Do you remember those edible elasticated bracelets that were made of pastel-coloured sweets? Well, this bracelet reminds me of one of ..."

Feb 23, 2011

Artist Spotlight and Tutorial "Cat in the City"

Cat in the City by Katja of Mainartwork

This tutorial is written in Russian, but I was able to use Google to translate the page.  I adore this bracelet and the beautiful photos by artist Katja of MAINARTWORK (user name: be_main).  First, the link to the tutorial:  http://community.livejournal.com/polymerclayfimo/3463010.html

Second, another page written by Katja with more of her art designs in polymer clay, as well as fabric clutches, paintings and more!
http://be-main.livejournal.com/

Enjoy the links and let her know your comments!

My First Polymer Clay Cane by York Avenue Studio

My First Polymer Cane by York Avenue Studio


I have to admit, I'm feeling jumpy with excitement after attempting to make a polymer clay cane!  It's one of those moments as an artist that I savor!  The rush, the feeling like I'll bust if I don't have somebody to share this adventure with!  This is why I love to create, to get that "peak" and see myself accomplish something that I feel is beautiful!  Ahhhhhhh!  Ok, here is what I did and why......

I follow several blogs and love to see the projects that other artists and designers are sharing online.  One inspiring blog is written by Charters, who welcomed me warmly to her blog and has a lovely manner with her words and designs.  Her blog, Charters Jewellery, has inspired me to try my hand at polymer clay beads.  I've never tried this before, and her beautiful photos of colorful beads along with her comments on tips for finishing the beads stirred up some ideas in my mind and I dug out my polymer clay supplies.

In my craft box, I had the colors blue, black, brown and white.  I also knew that I had some spare gemstone beads that are half drilled, in the same colors.  Lapis Lazuli, Tigers Eye and Pearl.  The design started forming in my mind to use polymer clay, the gemstone beads and also use silver metal clay. 

I searched online for some tutorials for making polymer clay canes.  I found the website called Beadeyedbrat.com with tons of tutorial links and great basics for polymer work. 

After scrolling thru the titles of canes, I decided to try the tutorial by Mia Rox called Swirly Brick Cane.

Throughout the cane making process, there was no indication that it was working.  I formed the pieces, step by step, hoping the design was building inside the log of clay!  All I could see was the black clay wrapped on the outside.

When the cane was done, I was intimidated to slice it, so I picked a spot near the end.  I'll have to read up on how to slice this cane properly without flattening the log.  Even so, LOOK WHAT WAS INSIDE!!!!


First Polymer Cane by York Avenue Studio


Now, what do I do!!!???  As I work on this new project, I'll post the updates.  I plan on making beads, tubes, etc plus finish and polish to shine like stone.  I can't wait to see how the gemstone beads fit in the design and what parts will be made in silver metal clay!  Plus, I have another opportunity to use my new logo stamp from the Charm Factory!
Kathy

Feb 19, 2011

Sculptor Carolyn Sato Now at Silver Heron & Bronze Coast - Coast Explorer Magazine

Sculptor Carolyn Sato Now at Silver Heron & Bronze Coast - Coast Explorer Magazine

Follow the link to see this amazing bronze sculpture with a polished Carnelian gemstone!  I couldn't resist sharing.
Kathy

Magic Wand Kitty and Goddess Face by York Avenue Studio

I'm sharing some photos of my current works in progress.  Pictured below are the two metal clay pieces that I made while testing my Signature Stamp from the Charm Factory. ( See my previous post, in case you missed the test review and video.)

I've been enjoying scupting little tiny kittys in clay, working at getting them smaller, more personality in their ears, tail, plump little rumps, etc.  I designed a Magic Wand with a star and handle and added Tanzanite for purple sparkle, little bumps to make the star glint in the light which also mask the little bumps that are holding the gems in place like little prongs.  I fired the Tanzanite in place and had great results using a torch.  I used Liver of Sulphur patina gel and LOVE the colors!  I haven't touched it yet to finish and polish, but couldn't wait to post photos of the work in the stages of progress.  My mind is swirling with ideas for beaded necklaces to make for these charms.  Still not decided on the finish...


Magic Fairy Wand with Tiny Kitty by York Avenue Studio

Back shows off the logo stamp

Satin finished Magic Wand with Tanzanite

Back of Magic Wand

Patina on Magic Wand

Back of both Magic Wand and Goddess Face
Goddess Face with patina by York Avenue Studio

The goddess face is so tiny and the details from the mold are just what I was going for.  The patina turned out great and I am afraid to change it, but I haven't even polished yet and might just leave it.  I'm still amazed with the tiny detail of the logo stamp.  The letters are smaller than the letters on the penny.

Hope you enjoyed these photos!  Special THANKS to the Metal Clay Heads Team on Etsy!! I am so proud to be a member and each of you have inspired me to push harder at designing metal clay pieces that are better than I could have done without you!!
Kathy

Feb 17, 2011

Part 3 Charm Factory Metal Clay Stamp Test - Video! by York Avenue Studio

So now that I've received my new Signature Stamp from the Charm Factory, here is my very own Testing Demo Video!

In case you didn't catch my previous post on this product review, I've been selected as a tester for a new product by The Charm Factory.
 
After I was contacted, we exchanged ideas on my logo design for the stamp.  The stamp is about the size of a thumbnail, 1/2 inch circle.  My logo is a little too complex to be that tiny, so I suggested a simple street sign with "York Ave".  Here is my logo and a preview of this idea:


I was pleased, but not completely thrilled that the stamp for my jewelry would be so simple and plain.  It was a wonderful stamp and I would use it, but I wished there was more detail.  Well, I am thrilled with what happened next! 

Here is what the stamp would look like in metal clay:


Charm Factory Signature Stamp


I drew a smaller version of my logo and played with the words and the picture and came up with an idea with more detail, but not so much that it wouldn't be recognizable as a stamp.  I sent the sketch to the Charm Factory for their input.

The Charm Factory responded very quickly with the following version of my logo sketch, which is the final design for my new stamp!  I am so thrilled with how professional the design looks and how wonderful the Charm Factory is to work with.  They truly put such effort into making my stamp look like MY stamp!


My sketch for logo


Charm Factory Design from my sketch


Charm Factory Signature Stamp - York Avenue Studio


I've had a chance to use my new stamp with some silver metal clay and I made a little video to show you all! 
 
From the product testing that I conducted using the Signature Stamp from the Charm Factory, I’ve discovered three possible ways to use my new stamp. 
 
1.  This stamp, used with a light touch, will stamp my logo very clearly on the back of my designs.  The stamp is very easy to use and leaves a super clear imprint of my logo with tiny words.  Amazing!
 
2.  My design includes a circle around the logo.  I found, by happy accident, that if I press firmly, the stamp cuts the circle out of the clay around my logo.  This makes perfect little jewelry tags!  I can put a small hole in the cutout and include this tag in my beaded jewelry.
 
3.  The little cutout circles can also be used to gently layer my logo onto the back of a delicate piece that a stamp would otherwise crush the design on the opposite side.  The logo cutout can be set into place with slip or paste and results in a little raised logo circle.
 
Without further ado.........


I am so pleased with this new tool and I hope that my testing results will help anyone deciding whether they want to order one for themselves.  I also hope that when you design your logo, you will consider whether you want the circle outline or not.
 
Please leave a comment below.  I would be very interested in what you think about my logo design and the Signature Stamps from the Charm Factory.
 
Disclosure: I received a custom-made signature stamp from Charm Factory at no charge in exchange for a review of my opinion. The opinions expressed are my own personal and honest thoughts. No other compensation was given.
 
Signature Stamps feature your logo or name and make it very easy to cleanly and precisely brand your jewelry and art. Simply gently press your Signature Stamp into the clay to cut a deep and lasting mark.


Signature Stamps


These custom made stamps are small (1/2" wide) and laser engraved to give you the precision impression you are looking for. You get a long lasting and clear product (unlike rubber stamps) and a great value over more expensive brass stamps. The handle is cast from lead free pewter, and your custom clay stamp is made to order from Delrin, a high temperature plastic also used for notary stamps and other demanding applications.

Order quickly online. There are no quotes, set up fees or additional costs. No matter what the content – text, your signature, or a logo – your Signature Stamps price is only $44.99. (Plus, free shipping is offered in the US.)

Feb 11, 2011

Tiny Kitty Cat on Brick Wall Fine Silver Charm Pendant

Tiny Kitty Sitting on a Brick Wall (and PB cookies!) by York Avenue Studio

Can you tell I was in a baking mood?  I made Peanut Butter Cookies using the classic recipe from Better Homes and Gardens.  My poor cookbook is all in pieces and taped at the binding!

Using Silver Art Clay, I hand sculpted this little kitten to sit on a brick wall, looking up into the night sky at the stars and moon. There is a crescent moon on top and a hidden heart in the stars!

I like the uneven edges of this piece, which are smooth, but not cookie-cutter because I like the impression that the scene continues beyond the pendant. I pictured this design in a nighttime setting with the moon glowing blue and the pendant shining in the moon‘s reflection, catching the highlights. The hidden heart is just under the kitten’s left ear, upside down in the starry sky background!

Moonlight Glow of Blue on Tiny Kitty Highlighting the Details

About silver metal clay:
Metal clay is made up of recycled silver grains mixed with binder ingredients which forms the consistency of clay. The wet clay can be molded and shaped, then dried, fired in a kiln or torched, and the end result is 99.9 pure silver in the exact shape of the design! Because this is pure silver, without any alloy metal , the jewelry may lack the full strength of sterling silver but is a wonderful alternative for those with metal allergies. With care, pure silver jewelry will be treasured for a lifetime. People collect silver dollars, and this pure silver jewelry also makes a wonderful investment or heirloom piece.

I'd love to hear your comments!

Tiny Kitty Sitting on a Brick Wall Gazing at the Crescent Moon by York Avenue Studio

Feb 10, 2011

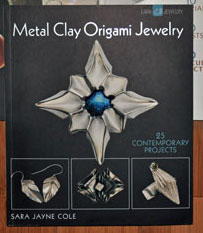
Winner of the Book Giveaway Metal Clay Origami Jewelry by Sara Jayne Cole


Craftgossip.com hosted a recent Giveaway for the book Metal Clay Origami Jewelry by Sara Jayne Cole.  I entered the contest and WON!!  I can't wait to receive this book!

Thank you Stacie!  For anyone interested in origami jewelry using metal clay, here is the link to the review on craftgossip.com   

http://jewelrymaking.craftgossip.com/giveaway/review-and-giveaway-metal-clay-origami-jewelry/

Here is the link to Sara Jayne Cole's website:

http://pmcorigami.home.mchsi.com/index.html

UPDATE:

I received this book plus a bonus book Jewelry Design Challenge, both signed by the authors!  I skimmed thru the Challenge book which is filled with well known artists and their projects, templates, design stories behind the scenes and great photos.  I also skimmed thru the Origami book and I am super excited to try the projects!  These books are such a treat and have inspired me with a flurry of ideas!

Feb 7, 2011

You Know Your State's Capital, but What about the Official State Gemstone?

If you are one of those people who can name all 50 State capitals, you are good!  Gemstones are officially adopted as well, however, not many people memorize the State Rocks, other than maybe the State they grew up in and went to school.  Gemstones, minerals and rocks are so unique and beautiful and their properties and characteristics are fascinating.  So many factors such as environmental conditions, other chemicals present, etc. affect the formation and substance of stones providing us with a huge number of varieties of colors and structures to admire.

So, what are the State Rocks for the 50 States?  Surprisingly, not every US State has adopted an official gemstone, mineral or rock.  Some States have several, and Texas even has their own official cut for a gem, the Lone Star Cut:


Texas Offical Gem Cut - The Lone Star Cut

I grew up in Michigan and early in school we all had to memorize the State Symbols.  The State Stone for Michigan is the Petoskey Stone.  As kids, we use to find them near lakes.  Spotting them is not too difficult as they have round, spikey circle patterns due to the fossilized coral.  Kids like to find fossils and there is something special about holding a rock that is over 300 million years old!

Petoskey Stone
Another State Rock that's easy enough to remember is California's State Mineral, Gold!  The Golden State also had a State Stone - Serpentine.  This stone, also refered to by some as New Jade has green color and may range from yellower greens to bluer greens.  NOTE:  In 2010 scientists moved to have Serpentine removed as the State Stone due to the fact it is a source for Chrysotile, a form of Asbestos, which is a human carcinogen!  The actual gemstone Serpentine is not toxic, but it is a host for Chrysotile, which has been found formed within the stone.  Making jewelry from Serpentine is not going to pose a health risk, unless you are smashing it up, year after year, releasing what may be lurking inside! 


Serpentine Rough


California also has a State Gemstone - Benitoite.  I've never heard of this gem, so I did some research.  It is a rare, blue gem found almost exclusively in California.  It turns light neon blue under florescent light!  Here is a photo:


Benitoite
Faceted Benitoite gemstone jewelry is very beautiful!  I'll certainly add that one to my gemstone collection wish list!

Well, there are many more interesting State stones and for a complete list and to look up your favorites, visit this site for a nice, handy chart:


Comments?  I'd love to hear from you!


Feb 3, 2011

Part 2 Charm Factory Metal Clay Stamp Product Test and Review by York Avenue Studio

Update for Feb 3rd:

I've been selected as a tester for a new product by The Charm Factory.  After I was contacted, we exchanged ideas on my logo design for the stamp.  The stamp is about the size of a thumbnail, 1/2 inch circle.  My logo is a little too complex to be that tiny, so I suggested a simple street sign with "York Ave".  Here is my logo and a preview of this idea:


I was pleased, but not completely thrilled that the stamp for my jewelry would be so simple and plain.  It was a wonderful stamp and I would use it, but I wished there was more detail.  Well, I am thrilled with what happened next! 

Here is what the stamp would look like in metal clay:


Charm Factory Signature Stamp


I drew a smaller version of my logo and played with the words and the picture and came up with an idea with more detail, but not so much that it wouldn't be recognizable as a stamp.  I sent the sketch to the Charm Factory for their input.

The Charm Factory responded very quickly with the following version of my logo sketch, which is the final design for my new stamp!  I am so thrilled with how professional the design looks and how wonderful the Charm Factory is to work with.  They truly put such effort into making my stamp look like MY stamp!


My sketch for logo


Charm Factory Design from my sketch


Charm Factory Signature Stamp - York Avenue Studio


I will be posting the testing adventure on my blog as soon as the stamp arrives!  Stay tuned, and here is some detail on these amazing stamp tools.  Visit the Charm Factory website at http://www.charmfactory.com/signature-stamps.aspx

Signature Stamps feature your logo or name and make it very easy to cleanly and precisely brand your jewelry and art. Simply gently press your Signature Stamp into the clay to cut a deep and lasting mark.


Signature Stamps


These custom made stamps are small (1/2" wide) and laser engraved to give you the precision impression you are looking for. You get a long lasting and clear product (unlike rubber stamps) and a great value over more expensive brass stamps. The handle is cast from lead free pewter, and your custom clay stamp is made to order from Delrin, a high temperature plastic also used for notary stamps and other demanding applications.

Order quickly online. There are no quotes, set up fees or additional costs. No matter what the content – text, your signature, or a logo – your Signature Stamps price is only $44.99. (Plus, free shipping is offered in the US.)


Feb 2, 2011

Winners Announced! January Challenge "My Favorite Place" Etsy Team Metal Clay Heads

Congratulations to the winners of the Metal Clay Heads Team Challenge! 

First Place Winner is "Mother and Child Pendant" by Ghislane of GS Creations!  Along with the privilege of issuing the next Monthly Challenge Theme, Ghislane now has "bragging" rights, as well as a photo of her design included in the Team Blog's banner!

To see the complete list of Challenge entries, photos and stories of inspiration, visit the Metal Clay Heads Blog:

http://metalclayheads.blogspot.com/

Feb 1, 2011

Charm Factory Signature Stamp Test for Metal Clay by York Avenue Studio

I've been selected as a tester for a new product by The Charm Factory.  I will be posting the testing adventure on my blog as soon as the stamp arrives!  Stay tuned, and here is some detail on these amazing stamp tools.  Visit the Charm Factory website at http://www.charmfactory.com/signature-stamps.aspx

Signature Stamps feature your logo or name and make it very easy to cleanly and precisely brand your jewelry and art. Simply gently press your Signature Stamp into the clay to cut a deep and lasting mark.


Signature Stamps


These custom made stamps are small (1/2" wide) and laser engraved to give you the precision impression you are looking for. You get a long lasting and clear product (unlike rubber stamps) and a great value over more expensive brass stamps. The handle is cast from lead free pewter, and your custom clay stamp is made to order from Delrin, a high temperature plastic also used for notary stamps and other demanding applications.
Order quickly online. There are no quotes, set up fees or additional costs. No matter what the content – text, your signature, or a logo – your Signature Stamps price is only $44.99. (Plus, free shipping is offered in the US.)

 http://www.charmfactory.com/signature-stamps.aspx

FAQs about Gold

Frequently Asked Questions:
Q:  What is White Gold?
A:  Gold is a precious metal and an element and is yellow.  Jewelry can be made from 24k pure gold because it is so soft and very strong, however, it is still very pliable and can be easily scratched or dented.  Gold jewelry is often made from a combination of gold and other metals, which is called an alloy.  For example, 14k gold is 14 parts gold mixed with 10 parts of another metal, equal to 24 parts or karats.  Likewise, 10k gold is 10k of gold mixed with 14k of another metal.  If the “other metal” is copper or silver, mixing it with yellow gold keeps the gold color.  More copper results in rose gold.  If the “other metal” is nickel or palladium, then the result is white-ish.  Recent years, white gold is commonly rhodium plated, partly because the “other metals” are not as high of quality and most manufacturers may just accept the lower standard because it will commonly be rhodium plated anyway.
Q:  What is Rhodium Plating?
A:  Rhodium is a precious metal and an element, like gold, but much more expensive.  The opposite of pure gold, which is soft, rhodium is too brittle to use for jewelry, but perfect for plating due to the dazzling shine, much like chrome, and the durability against tarnish and wear.  The white mirror-looking Rhodium plating will still wear off after time.  If the metal beneath the plating is a contrasting color, the wear will show up more obvious than a similar white metal below the plating.  Almost every piece of white gold jewelry is rhodium plated, whether it is stated or not.
Q:  What is Gold Plating?
A:  Layering gold over another base metal, the industry standard is .15 to .25 mils thickness plated over the base metal.
Q:  What is Gold Filled?
A:  Also layering gold over another base metal, but the layer or layers are combined and rolled together with a thickness that is usually stated.  For example, 1/20th  14k gold filled means that the piece is at least 1/20th of 14k gold of the total weight.
Q:  What is Vermeil?
A:  Sterling silver piece that is heavy electroplated with 22k yellow gold.  The depth is about .002 or .003 inches thick.

Zircon – A wonderful Diamond-Alternative

Zircon
The general public often confuses Genuine Natural Zircon with Cubic Zirconia, which is lab-created imitation diamond.  Zircon is a beautiful weighty natural gemstone that occurs naturally in several colors.  It has a refractive index of approximately 1.95, very similar to Diamond, which is about 2.4.  The hardness factor is rated at 7.5 on the Mohs Scale.  Zircon makes a wonderful diamond-alternative.

Gemstone Clarity

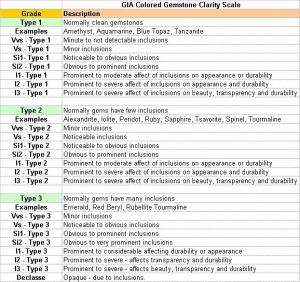
Clarity is defined as the presence or absence of blemishes, visible to the naked eye or under a microscope.  Inclusions could be a result of a fracture or chip in the gem, foreign substance or object or a malformed crystal.  These inclusions may affect the value, however, several gemstones occur normally with inclusions, such as ruby or emerald, which doesn’t equate to an automatic lowering of value.
The GIA has developed a clarity grading scale for colored gemstones.  There are three types or classes for gemstones and the following chart summarizes the GIA grading for clarity (click on image for larger view):

Clarity Grading Chart

The Story of the Amethyst Ring

Starting out with a memorable 1st gem I ever owned, 10 x 8mm rectangle Smoky Quartz, I’ve taken what I’ve learned by experience and have become very accomplished at selecting gemstones, envisioning just the right settings, getting the stone straight, prongs at the right angles without dents (oh, those first attempts back at the start!), the settings are polished to gleam and the final buff is gorgeous!  Very tedious work and very rewarding.

I’m so passionate about gemstones, their properties, their origins and the history.  So much to learn, too, about finishing precious metals.  I will never get bored of my work and look forward to the moments that I can sit down and start a new project.  I’d love to keep each finished piece, but I’d also feel proud for someone else to choose my jewelry to wear and enjoy.  My items are not like the mass-produced rings out there for sale, no one put their creative energy into focus to make them individually, mine are handcrafted one by one, each piece given 100% focus so it will become a small precious treasure to own and keep for years.
Almost always, there is a little story behind each piece of jewelry that I create.  Something about the gemstone or the setting.  This is the story of the Amethyst Ring:

This night started out pretty much the same as usual, I waited until the baby was asleep to start working.  I had three ring settings that were polished and ready to set gemstones.  I’d been holding the gemstones for a few weeks, waiting for the inspiration on how I wanted to set them.  Once I decided to use antique style rings, I contacted my silversmith to cast the rings and model them after antique settings stumbled upon at estate sales.  Once I received the castings, it took some time to get them filed, sanded, polished and buffed.  Now the rings were ready and so was I, I couldn’t wait to get started!

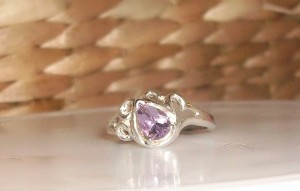
One of the gemstones was a bright purple Amethyst pear, so pretty!  My oldest daughter has always loved Amethyst, so I thought of her the entire time I was setting the gemstone and finishing the ring.  Being that my daughter is older now and going to college 650 miles away, it didn’t seem likely that she would get to see the ring, and I planned to post the ring on my Etsy website for sale.  But this night, I re-lived some memories of when she was younger and how she would be drawn to the purple gemstone, especially the rougher version rocks or the crystal versions that look like spears.  Once, we had made a trip to the Detroit Science Center and the gift shop sold little bags of rocks, minerals and gemstones. Pretty stones to collect.  The Amethyst was her favorite.  I took some nice photos tonight of the finished ring and started to put my tools away and call it a night.

Just then, my phone rang.  It’s after midnight, so that surprised me.  A bigger surprise was that the call was from my daughter!  Not only was it ironic that she called right while she was on my mind, but she was only 3 hours away and asked if she and her friends could spend the night!  Wow!  I was so excited, no bother at all no matter how late, I got a second wind, and started setting up the pillows and blankets for her to arrive!
As she and her friends settled in, tired from the drive, I took a tiny moment to show her the Amethyst ring photos before we all went to sleep.  In the morning, I had the pleasure of making a huge breakfast for everyone, I made waffles and bacon, my home smelled so great and we all had such a nice visit.  I miss all those times from when the kids were younger and this was such fun!

I took the Amethyst ring from the packet and gave it to my daughter to try on and it fit her.  She was very happy and told me the ring was beautiful and I told her all how she was the one I had on my mind as I was crafting the ring.  How amazing that she would be right with me, in person, out of the blue, that I could present the ring to her as a special gift, just because I love her and know she really loves Amethyst.  It was such a special moment, when just a few hours before there wasn’t even a hint that I would have this opportunity!

As she and her friends headed out with hugs and home-made sandwiches for the road, I had a “mommy” moment to treasure as a wonderful memory with MY daughter.

That makes the Amethyst ring priceless.

Amethyst Ring
My Daughter's Amethyst Ring