Mar 22, 2012

Discovery! Natural Rainbow Hematite Gemstone

Rainbow Hematite Earrings by York Avenue Studio
Never heard of this gemstone?  A client mentioned that she had seen some beautiful jewelry years back made with Rainbow Hematite, and she had always wanted to own some.  I had to look it up because I had never heard of or seen this gem before.  Instantly thrilled, I found a supplier and ordered some pieces that were rough, not finished.
The sparkly surface looks man-made, with gleaming rainbow colors.  The colors are vivid and there are several colors all grouped tightly together, it almost seems impossible that such a gem is natural.  Bright pink and electric blue, peacock purple and greens, amazing colors!  The gem reflects light when held one way, and seems to appear dark gray or black when turned slightly.  The top and bottom both have completely different colors and it was very hard to decided which side to call the top.
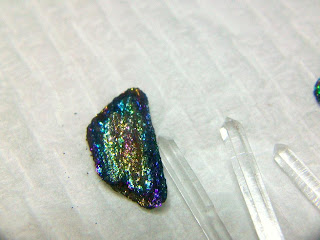
The material is very brittle, flakes of glitter come off easily and the gem seems very easy to chip and break.  I sanded the edges smooth to fit a bezel with 600 grit, very softly and slowly.
I decided to make earrings, which would be less stressful for the gems, less chance of being bumped on tables, less wear and tear like a ring would receive.

Inspired by a tutorial from Marilyn Mack, I decided to fabricate a multi gemstone collage.  Her tutorial, “Atlantisite Serpentine Pendant” is available on the Interweave site shop.

Recently, I am finding that my designs have a pear-shape.  Without doing this intentionally, I noticed that the pieces I like the most have this same shape, like a mini-pear.  Rounded near the bottom, sloping up and curving off center a bit.  Somewhat like paisley shape.  For these earrings, the same thing happened.  As I put the gems around the Rainbow Hematite, my eye picked up the familiar pear-shape again.  I decided to turn it upside down and for earrings, this looked very nice with the larger wider portion at the top tapering down.
My design is a little Southwest with some Art Deco mixed in.  I selected some gems to compliment the colors:  Ruby, Amethyst, Aquamarine, and Tsavorite Garnet.  I drew a sketch, laid out the gems, and made a few adjustments.
A couple of days work, and Voila!  The green Tsavorite Garnet really lights up and plays off the Ruby and Rainbow Hematite.  The subtle Amethyst and Aquamarine look perfect as complimenting colors.  The Rainbow Hematite is gorgeous all by itself, and I didn’t want to distract from it.
I made post earrings with puffy squares in a line, which have a patina with glints of blue and red hues.  Overall, the design has an organic rustic look.  Nature inspired, these earrings look like a leaf dangling from a branch, bursting with Spring color. 
I’d love to hear your comments about Rainbow Hematite.
Kathy

Mar 11, 2012

Vote for your Favorite!

Umbrella Ring Silver Spinner by York Avenue Studio

The Metal Clay Heads team on Etsy is holding another vote.  The Challenge theme is Geometric with Movement.  I've entered my Umbrella Spinner Ring made with fine silver and a heavy copper ring band for the handle.  Visit the following blog to vote!

http://metalclayheads.blogspot.com/2012/03/geometrics-challenge.html

Umbrella Ring Silver Spinner by York Avenue Studio

Mar 2, 2012

White Opal Rough - Cutting My Own Gems

I am fascinated by the process of cutting and polishing gemstones.  I look at my collection of shiny gems and wonder, “How did someone see this beautiful gem from looking at it in the rough stage?”
Opal is a soft stone, so I decided that I would try to cut my own gem.  I had a nice little chunk of White Opal rough that I bought originally to wire wrap “as is” for a pendant.  I studied the play of color that I could see from the outside and looked at the stone with light shining from behind.  This gave me an idea of two places that would make nice gems.
I started to drill the piece into two sections, keeping it cool and wet with water, going slow.  I successfully separated both chunks.
I started to grind away the potch, the rocky parts and the plain areas, making the flat bottom.  I carefully smoothed the larger flat stone to give it a shape of a freeform oval.  The skinny piece has so much gorgeous color, I decided to take a break and get some proper tools to make that one into a nice domed cabochon.
So far, I’m thrilled with the results!  I have several sanding and polishing steps to go, but I am no longer afraid of killing an Opal!  This was a fun experiment and now I have a wish list full of new tools that I want!
I will leave the cutting to my professional supplier for my Opal needs, but I will keep at my new hobby until I can produce my own Opal gems!
Kathy