Feb 24, 2012

Bold Copper Weave Stack Ring Tutorial How To

Copper Weave Stack Ring by York Avenue Studio
This statement ring looks like woven rings of bold copper and has an impressive wide band.  Comfortable for ladies as well as gents, this ring is easy to make with a few tools and basic metal skills.  I decided to share my steps in making this ring.  Feel free to make one for yourself.

I start with about 12 inches of copper wire, round 14 gauge.  Flush cut the ends and sand flat.  Place the wire centered on a ring mandrel at the size you want your ring, maybe a little smaller.  The ring will get larger with hammering at the end and you can size it right then.  I’m making this ring a size 8, so I use the size 7 on the mandrel.
I wrap both sections, right and left, around the back of the mandrel, crossing in the middle and stop.  Flip the mandrel so the cross section is facing me, this is now the front.
The wire that is at the bottom that crosses up over the top wire, this will be the first wire to work with.  Continue with this wire around the mandrel along the top edge of the wire back to the front, stopping before reaching the front center. 
I bring the second wire up to cross under the top wire.  The wires will only cross in the front and line up in rows in the back.  The cross overs in the front will alternate.  Continue until you use up the wire, watching for the last completed row where the ends will still meet.  Trim the ends to meet, preferably in the back of the ring.
Using pliers, line up the ends to touch and solder the joint.  I left the solder joint silver, but copper color solder can also be used.  Using a patina or pickle that is contaminated also will “plate” the joint more like copper color.
Return the ring to the mandrel and reform the bands with a rawhide mallet, shape the ring, line up the bands.

If the size is too small, hammer it larger. I use a steel hammer to make a hammered texture with facets.
Tumble with shot to polish and work harden the ring.  Patina to darken or keep it shiny.  Protect the finish with Ren Wax which also weatherproofs the ring.
The final ring has such smooth lines, nice texture and the pattern is nice for a subtle chic everyday ring.

If you make one, let me know, I'd love to see your photos, too!
Kathy

For another amazing copper ring tutorial, please visit my Etsy shop for the instant download PDF to make a Copper Ball Love Knot Friendship Ring by York Avenue Studio

https://www.etsy.com/listing/83350862/tutorial-pdf-wire-wrapping-copper-ball?ref=shop_home_active_14


Feb 16, 2012

Candy Tin Roses

Valentine’s Day held a hidden surprise inside my box of chocolate!  Just like Forest Gump, you never know what your gonna get…….
This lovely tin had soft roses raised on the lid.  I turned it over and saw with my metal clay eyes, Rose Molds!
After taking a bit of left over clay and kneading it with a drop or two of water, it was perfect for pressing into one of the rose shapes.  I used a little silicone hand lotion on the lid and the clay came right off the mold, shaped so softly like a rose.


With just a bit of sanding and after firing with a torch, I had a gorgeous fine silver rose with delicate detail and curves that were smooth.
I burnished a tiny spot on the back to solder on a bail.  The bail is handmade from sterling wire, stamped with “love”.

This necklace is so feminine and brings to mind something that a bride would wear on her honeymoon!  I crocheted wire with glass beads to make the chain, which ends with a few inches of Rollo chain behind the neck for comfort.
Like is like a box of chocolates!

Feb 13, 2012

Silver Overlay Paste - This stuff is Magic


Silver Overlay Paste has so many uses and I haven’t explored them all yet.  I have had the chance to use it for embedding sterling in metal clay as well as use it for “soldering” pieces together.  Here are my notes.

Embedding Sterling in Metal Clay

I have been successful at embedding sterling silver in Art Clay Silver using the slow dry low fire clay formula.  Using a torch, carefully watching the color of the orange glow in the sterling, it is possible to incorporate sterling into metal clay designs.   Now, I’ve discovered Silver Overlay Paste which gives even better results with such a strong bond allowing me to make the most complex designs yet.

Overlay paste is not regular paste and it is not oil paste.
Regular paste can be mixed at home by adding water to fresh clay (or dried clay that has been crushed) to dilute the clay to a paste, thick or thin.
Oil paste can also be mixed at home by adding essential oil (like lavender) to regular paste.

Here are only some uses for these pastes:

Regular Paste - use it on fresh or dried clay, not yet fired.  Paint leaves, fill molds, many uses.
Oil Paste - use it to join fired clay to fresh or fired clay.  Must be fired at full temp for full time.
Overlay Paste - specifically formulated to fire at lower temp, 1200 degrees.  Great on ceramic, porcelain, and the first point of contact between any objects embedded in clay.  Very friendly to torch users.

I use two different methods for embedding sterling depending on if I am using the overlay paste or not.

Without Overlay Paste:
The sterling will need to be “gripped” by the clay so I make sure the part that is going into the clay has a bend, a loop, or I hack it up a little with a file or cutters.  This gives the clay something to grab onto as it fires and shrinks around the sterling.  I also torch the sterling to get it to a deep gray black color, then pickle the piece back to silvery color.  I use a little regular paste on the part that is going into the clay and push it into the clay and let it dry.

With Overlay Paste:
I torch the sterling, pickle.  Paint or dab the overlay paste on the sterling that will be attached and press it in place. Both methods might require a little filing or sanding before firing.  Both methods can be torched, and watching the color in the sterling has been key.  Sterling has a melting point somewhere around 1650 degrees.  If you have ever balled the end of a wire, for an earring perhaps, you’ve seen the salmon color turn to bright orange as the end balls.  That color will assist you when torching, as you do not want to get to the bright orange color and melt your sterling.  You also want to keep the temperature hot enough to properly sinter the metal clay.  If careful, it can be done!


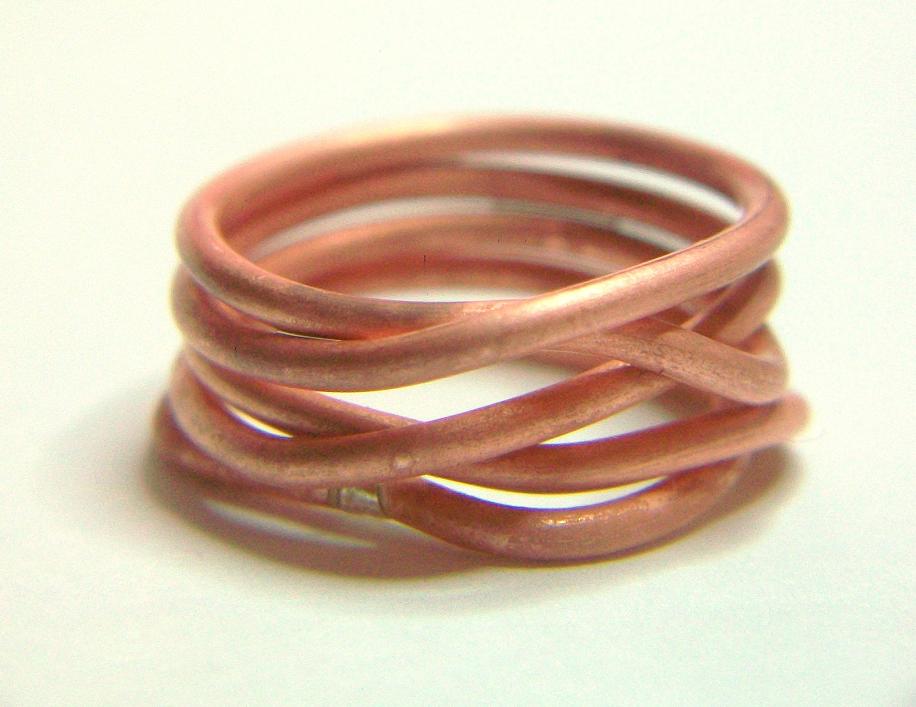
Here is an example of sterling embedded without overlay paste.  This is my Bird Nest Mothers Ring.  I embed the prong settings and the ring band into the fresh clay, let it dry and torch.


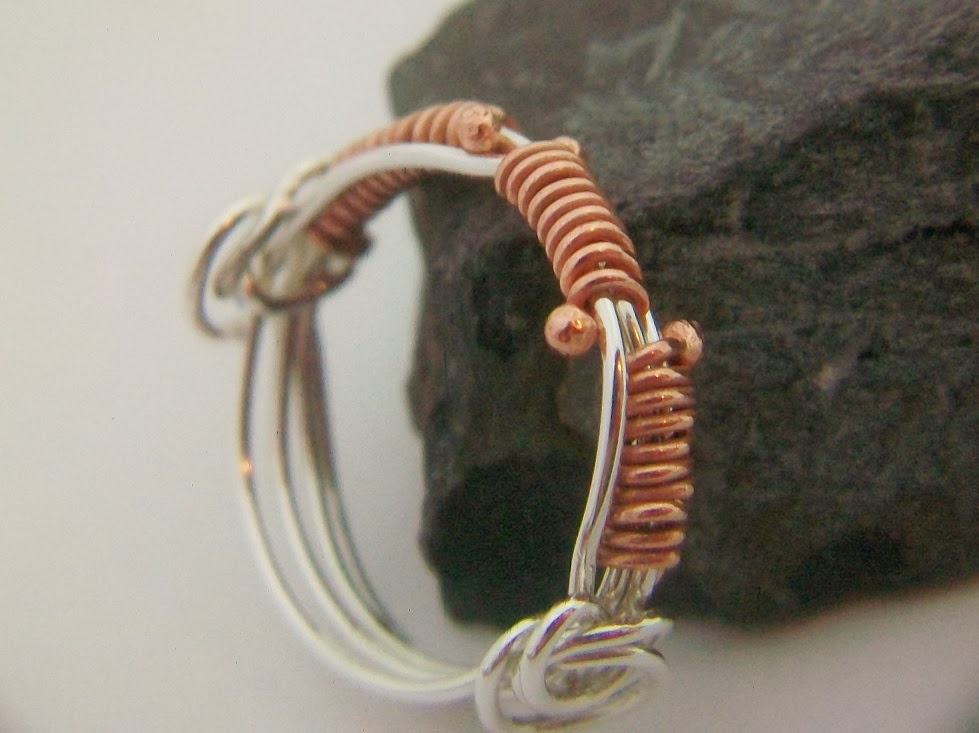
Here is an example of sterling embedded with overlay paste.  This ring has 8 joins which means 8 places that needed two parts to join together.  I used a metal clay heart for the ring top that was fired alone first.  I then made a bezel with sterling gallery wire, not joining the seam.  I used overlay paste to attached the heart to the top of the gallery wire, overlay paste on the bezel seam, overlay paste on the bottom of the gallery wire and embedded that into a rolled out piece of clay.  I trimmed the clay around the bezel, outside and inside, let it dry and fired it all together.  From this point, no solder was used.  I was free to solder the ring band and prong settings, as well as resize the ring band using solder, no worries that it would collapse from the heat.

Overlay Paste Can Be Used Like Solder and Unlike Solder

This overlay paste is very much like soldering, because it joins pieces together.  It has a bright silver color, better than silver solder. 

It is very different in that is has to dry first, but it can fill gaps, it holds pieces together as they join like glue, no worries about undoing previous joins.  No flux used and the pieces don’t have to be perfectly flush to join.  The list goes on.  The overlay paste works best with joining larger surfaces and may not work well on tiny spots.  For example, resizing a ring only requires the tiniest join, best done with solder.  My heart ring top had a continuous line of overlay paste which bonded perfectly to the sterling bezel wire.
For anyone that is learning to solder, this overlay paste is something that I recommend you consider to learn, too!

Overlay paste is amazing, strong, and versatile.  I am hoping that this post will give other metal clay artists a fresh look at something that might have been overlooked before as “just another paste”.

Feb 9, 2012

Moonstone Magic Harnessed

Moonstone is a gemstone in the Feldspar family.  The name conjures the image of moonbeams and wispy clouds that glow and shimmer from within the stone.  The Opalescence and milky hue of this gem have long been admired and coveted as powerful, passionate and magical.  Beauty lies within….

The association with the Magic of the Moon lends itself to the imagination and all the possible special affects this stone might bestow on those that possess it.  Could you imagine what powers one could have if the powers of the Moon could be harnessed in a gem?  The mind wonders…
I love the name Moonstone.  The other Geological name Hecatolite doesn’t really “feel” positive.  Moonstone, that is a great name especially for jewelry!  Did you know Moonstone is an alternate Birthstone for June?  Traditional Birthstone for June is Pearl, as well as Alexandrite.  Lucky are those with June birthdays!!
Moonstone possesses an actual phenomenon.  Adularescence is when light scatters within a stone between the natural flat layers within the gem.  A marvel of nature as the stone forms in the right conditions with the right minerals.
My favorite color of Moonstone is White with blue flashes.  I’ve seen this color called Rainbow Moonstone.  Other colors include peach, green, blue, gray, brown.  Photographing Moonstone is tricky, catching the light just right, the result will be different on bright days v. cloudy days.


I would love to hear your comments on Moonstone, whether you own this gemstone, your favorite color or piece of jewelry and maybe a little story of what the stone means to you!  Have you harnessed the Magic of Moonstone?
Please, comment below.