Showing posts with label handmade. Show all posts

Oct 19, 2011

New! Fall/Winter 2011 Collection Revealed

Dream Cloud Ring with Citrine by York Avenue Studio
I'm so happy to show off my latest line of designs!  This collection is all about genuine gemstones and bold silver settings.  This Dream Cloud Ring has puffy swirls that showcase the delicate colored Citrine.  I've added blue hues with a patina to the prong setting, which reflect thru the stone, very unique!

Dream Cloud Ring by York Avenue Studio
Each design is completely fabricated in my studio by hand giving me the freedom to customize the design according to customer preference of gemstone, ring size, etc.

Genuine White Opal Heart Earrings by York Avenue Studio
My goal was to produce genuine gemstone jewelry that is affordable and durable.  The design style for this collection is Shabby Chic and Rustic.

Pearl Engagement Ring by York Avenue Studio
The gemstones I've included in this series are delicate and light, with Pearls, Opals, Citrine.

Pearl Silver Ring by York Avenue Studio
This collection includes matching earrings and rings.

Pearl Silver Earrings by York Avenue Studio
I love working with Silver Art Clay and Sterling Silver.  Every design in my collection for Fall/Winter 2011 is made with precious metal and genuine gems!

Steampunk Silver Heart Ring by York Avenue Studio
The entire collection is available in my shop on Etsy.  Custom orders are always welcome! 

Sterling Hoop Earrings by York Avenue Studio
Each piece is priced at a great value for fine silver and gemstone jewelry.

Spider Web Ring by York Avenue Studio
I'd love to hear your comments and which piece you like and why! 
Thanks for looking and sharing this big reveal moment with me!
Kathy

Jun 29, 2011

100th Follower Half Off Coupon Code for Fine Silver Feather Earrings!

In anticipation of reaching 100 followers on my blog, I am celebrating by offering a super special SALE on my Fine Silver Feather Earrings.  The special is for a limited time.  I will make as many pairs as needed for this offer and keep the offer open until the end of July 2011.  My goal is 100 pairs ordered.  I also will be forwarding the proceeds of this offer to a special family that recently lost their home to a foreclosure and are split temporarily while looking for another place to live together.  They are in my thoughts and my heart goes out to them. ♥

Fine Silver Feather Earrings by York Avenue Studio

For only HALF the regular price of $30, each customer will receive a pair of Fine Silver (.999) Feather Earrings with sterling silver ear wires for only $15, shipped FREE to the US.  For other locations, please see the shipping chart at the bottom of the listing in my shop.  You may also order them at full price, of course, and more proceeds will go to the family.


I use real feathers as shown in the photo.  The feather is the natural "mold" to shape and provide the amazing detail.  The result is .999 pure silver gorgeous feathers! 


Fine Silver Feather Earrings by York Avenue Studio

I will offer these as shiny silver with a satin brushed finish or with an antiqued silver finish, just let me know your prefererence at checkout.  The length is about 1 1/2 inches and each feather will be unique.  These are high quality, lightweight and very comfortable.  Feathers are very hot in fashion styles and this unique design is extraordinary and sophisticated!

*********************************
Please "Follow" my blog and leave a comment below requesting this special 100th Follower Half Off Sale!  I will email the Coupon Code to you, so make sure you include your email address.  If you'd rather just email me for the code and not leave the comment below, that is great, too!  The Coupon Code is only valid for these earrings in my Etsy Shop, York Avenue Studio.  Not valid on any other item in my shop.  These are custom made to order and the proceeds will be donated, please understand no refunds or returns.  Normally, these ship out in a few days, but please allow 7-10 business days to complete your order.  I'll notify you when they are ready to ship!

Pass this special along, use twitter, Facebook, call your friends and family, tell your co-workers!  These earrings will make great gifts for birthdays, teachers, wedding and bridal party gifts, moms, daughters, nieces, aunts, sweethearts, wife, girlfriend, etc.

Order a pair for yourself and order another pair to keep handy for a last minute gift.


Fine Silver Feather Earrings by York Avenue Studio

I hope you enjoy this special and I am very excited that I have so many blog followers and friends to share my jewelry-making adventures!  Feel free to leave a comment, even if just to say Hi! I realize most of my followers make their own gorgeous jewelry, and I appreciate your comments.  I certainly hope to find new followers that will join me and would appreciate fine silver at half off!

I'm also holding a Free Jewelry Giveaway to add to the celebration, click here!
Kathy

May 7, 2011

And the Winner Is.........

Thank you all so much for participating in this Giveaway!  It was such a pleasure be the host and introduce the handcrafted works of Adornyourself!  The interview with Kathy shows how much work and thought and experience goes into her designs and she is truly a classic, self-taught successful artist!  Here is the link to the interview and the original post as well as all of the great comments!


Using Random.org I generated the lucky winner.........The winner will be receiving the Pure Silver Nautilus Beach Stone Pendant AND the wheelthrown pottery coffee mug shown above!

The winner of the Giveaway is Jennifer of Envy Designs Jewelry!  Thank you for participating!  Jennifer is an amazing jewelry designer that also uses metal clay for her exquisite pure silver designs.  Please stop by her Etsy shop and enjoy her work!  Congratulations!
I hope you all enjoyed this contest and I will plan another Giveaway soon!
Your support is much appreciated and thanks so much for joining me!
Kathy

Apr 14, 2011

Closed! Jewelry and Pottery Giveaway - Fine Pure Silver Beach Pendant Plus Handmade Coffee Mug

In this post, I will introduce to you Canadian Jewelry Designer and Pottery Professional, Kathy McDonald of Willow Tree Designs, Brandon, Manitoba.  She has graciously offered a Giveaway Contest, which I am hosting on my blog!

I'll include the details on how to enter the Giveaway Contest in this post which includes two amazing handmade items selected specifically by Kathy for this Giveaway and for the lucky readers of my blog! 

The winner of this Giveaway will receive the handmade items pictured below!  Exclusive designs by Kathy McDonald.


Giveaway Prize - Handmade Fine Silver Nautilus and Beach Stone Pendant AND Handmade Pottery Mug!

Closer Look:


Pendant: Drilled Manitoba beachstone pendant with handforged Fine Silver Nautilus design, oxidized for antique finish with polished highlights, gorgeous!  The cord necklace is included and is finished with a sterling silver small lobster clasp.  The Fine Silver design is handmade by Kathy using Silver Art Clay and is 99.9% pure silver!


Coffee Mug : Wheelthrown stoneware coffee mug with hand painted overglaze decoration, 10 oz size.  Collectors of pottery, this is such a unique design, directly from the artist herself!

One lucky winner will receive Kathy's gorgeous pendant and coffee mug!  Everyone is invited to browse her shop on Etsy.  If you're lucky, there will still be items available, as she sells out quickly, especially her jewelry designs.  Visit her Etsy Shop, Adornyourself and mark your favorites with a "heart".

 Father's Day is fast approaching and handmade pottery is the perfect gift.  Any birthdays that you know of for May or June, plan ahead now and order them a handmade item from Kathy's shop!


Sculptural Pottery Bottle by Adornyourself

I met Kathy when she joined the Etsy Metal Clay Heads team.  We both have shops on Etsy, the website for handmade goods, vintage goods and supplies.  We both share a passion for using metal clay for jewelry designs.  We both are named "Kathy" with a "K"!  What I find extraordinary about Kathy is her mastery of both pottery clay and metal clay and her skill at creating jewelry and pottery that anyone would be fortunate enough to have in their collections!


Pottery Basket Coil Built Sculpture by Adornyourself

Kathy’s pottery background inspires me with her knowledge of kilns, firing temps and schedules (and repairs), her impeccable talent for creating forms and her techniques for enameling, which she used to teach.  I enjoy the monthly chit chat about the daily projects, the good times, the bad times and sharing the ideas, tools, tips and trials of our craft.

Kathy creating a wheelthrown bowl just this week!


I had the pleasure of interviewing Kathy about her jewelry making and pottery adventures: 

YorkAvenueStudio:  Kathy, you started working with pottery clay almost 40 years ago and still have the enthusiasm and enjoyment which shows in your creations.

Adornyourself:  I am retired now after a long career as a social worker and educator and can devote a lot more time to my business of creating and learning.  I know that combining family, outside work and a clay addiction are very difficult to balance.

Even after all this time I am still amazed at the transformation of the raw materials into the finished pieces.  That connection of human hand, earth, and fire that has been entrancing people for centuries.
I love glazes that are warm and earthy and draw most of my inspiration from natural objects and the prairie landscape around me.  I work with both stoneware and porcelain clays, as well as metal clay and really like to experiment with glazes that are natural and earthy.  I make all my own glazes from raw natural materials.

Fine Silver and Birthstone Bridesmaid Charms by Adornyourself


YorkAvenueStudio:  When did you start using metal clay? (Precious metal clay, PMC or Silver Art Clay, is made up of recycled silver grains mixed with binder ingredients which forms the consistency of clay. The wet clay can be molded and shaped, then after drying, fired in a kiln or torched with the end result as 99.9 pure silver in the exact shape of the design!)

Adornyourself:  I bought my first packets of metal clay when you had to purchase them from overseas and the instructions and booklets were all written in Japanese.  It was so exciting to have an opportunity to turn “clay” into fired metal.  I have a good friend who is a silversmith who agreed to mentor me back then and we both have been able to collaborate and learn the materials.

Lots of mishaps and waste but my friend was able to use the scraps in his designs.

I started out using PMC3 (I date myself) and switched to using Art Clay Silver
a few years ago after volunteering to co-teach a class at the local art center here and that’s what they had ordered because they got a deal.  I’ve kept on with Art Clay Silver because it’s more readily available here.


Handcrafted Stonewear Pottery Beads by Adornyourself


YorkAvenueStudio:  What materials do you use to make jewelry?

Adornyourself:  I use mostly stoneware and porcelain to make pendants, beads, and other components for my designs, and combine these with many other materials including the metal clay, glass and semiprecious stones.
I have a passion for bead collecting and my favourites include artisan glass lampwork and African trade beads.

Hand Marbled Porcelain by Adornyourself


YorkAvenueStudio:  What was your first inspiration for jewelry design?  How did you decide to make jewelry?

Adornyourself:  Good question. I think my first inspiration for making jewelry was watching my dad work in his shop when I was a child.  We lived on a farm and he often repaired machinery and made or repaired horseshoes for our horses. I can still remember the smell of that shop and the old anvil and fire pit.  I was fascinated by the fire, the metamorphosis of the materials from molten to finished product, and the rhythmic pounding of the hammers used to shape those metals.

Now my inspiration is the textures and impressions that natural materials and images evoke.
I ‘m very inspired by the design courses I’m taking that are leading me to explore the natural geometry and symmetry that occurs in objects of everyday life and the world around me.


Porcelain Pendant by Adornyourself


YorkAvenueStudio:  What shows off your style the most in your jewelry designs?

Adornyourself:  I think my style (if I have one) seems to change and include something new and different every day. Making jewelry lends to the exploration of many materials incorporated in various ways to make a whole.  The whole is so often greater than the sum of its parts.

I have tended toward very simple designs when I use metal clay and more complex forms when I use stoneware and porcelain. I love using fired lustres and enamels to embellish porcelain and I would really like to explore this next.

YorkAvenueStudio:  Does your background in pottery lend itself to jewelry making?

Adornyourself:  Yes it definitely does.  Over the years, I’ve made many discoveries about metal and clay simply by experimenting with both materials and combining them.  Some have been utter disasters. Others have been quite beautiful, but difficult to replicate. Like throwing silver and copper clay into the raku  combustion can with my pots. Gorgeous pieces, but I’ve never been able to replicate them.

YorkAvenueStudio:  We talked once about the necklace that you made that you wear daily.  Tell me the inspiration for that piece?

Adornyourself:  I do have a piece of mine I wear all the time. When my daughter got married several years ago I made 2 very similar pieces so that we could wear them on her wedding day.  We both wear them a lot.


Special Wedding Day Necklace worn often by both Kathy and her daughter


YorkAvenueStudio:  With the price of silver almost 4 times what it was last year,  how is this affecting your designs?

Adornyourself:  The cost of silver has made it quite difficult to be really as creative as I’d like to be with the material. I am so much more conscious of the amount of material I am using that I think it inhibits the kinds of things I undertake.  I’m tending to want to go back to things I’ve abandoned in the past like working more with sheet and copper.

Adornyourself Craft Show Jewelry Display


YorkAvenueStudio:  What are some tips or techniques for working with metal clay that work for you?

Adornyourself:  I know this likely isn't really accepted, or proper, technique but I sometimes use a bit of liquid polymer to help condition my clay when I`m getting it ready to use,or to coat the clay if I want to have a clean line etched into green pieces. I found that it makes the art clay a bit easier to handle during its green state and does not affect the fired outcome at all. NOTE:  I have a big kiln with lots of ventilation so I do NOT torch fire the pieces because of the toxicity.

I often make my designs in clay before I make them in metal clay, that way I can get a good idea of what they will be like once I commit them to silver.

YorkAvenueStudio:  Tell me some things about you that you are proud of accomplishing, dared to try or on your Never Again list.

Adornyourself:  I was very proud to have had a “one person” show at our local art gallery several years ago.

Never try again: demonstrating torch firing at a local music festival and art sale.


Adornyourself Pottery Craft Sale Display


YorkAvenueStudio:  Do you participate in craft fairs or shows?  Stories to share, tips on booth

Adornyourself:  My main outlets for selling now are wholesale to shops, galleries, and maybe one major craft sale a year. I find our local farmer’s market and open houses through friends are my best profit generators.

I have done craft shows for many years and my stories would likely be a whole other blog post.

The funniest anecdote I can tell you all happened at a folk music festival last summer.  My adult children were helping me out at my booth when my daughter noticed a woman openly breastfeeding her baby while trying to sell her work.  They both made comments to the effect that they felt that the time and place were inappropriate when the fellow in the next booth to mine piped up and said, “ I remember your mother breast feeding you at this festival some 20+ years ago, don’t knock it, it gets the job(s) done.”  Total silence from my kids.

YorkAvenueStudio:  When you are not working with clay, what keeps you busy?  Other hobbies, interests, goals?

Adornyourself:  I love to cook and bake.  I’m a Food Network junkie and I constantly try out things on my husband and our youngest son.  I also love to garden and my husband and I have a big garden every summer.  We rent a booth at a local farmer’s market where we sell our produce, my pottery and baking, and of course my jewelry.

We have a dachshund named Cashmere who needs to be walked LOTS!

Goals: Finish my BFA…maybe? Keep creating…. Yes!

YorkAvenueStudio:  How can readers find you? 

Adornyourself:   My primary web presence:

Etsy Shop

Flikr

Facebook
http://www.facebook.com/#!/profile.php?id=1342327795

If you are lucky enough to live near Kathy in Manitoba, Canada, here are some local shops and galleries that you may find her designs:

Poor Michael's Bookshop Art & Cafe
http://poormichaelsbooks.ca/

The Cinnamon Tree
934 Rosser Ave, Brandon, MB R7A 0L4

Dundee Designs
http://store.dundeedesigns.com/

Art Gallery of Southwestern Manitoba
http://www.agsm.ca/


***************************************

If you want to contact Kathy regarding her pottery and jewelry, please visit her shop on Etsy Adornyourself and use the contact link.

Now for the details on how to enter the Giveaway!

Contest runs from April 14th thru May 6th, 2011.  There are several ways to enter the contest.  Each point below will count for one entry, please leave a separate comment below this post for each of your entries, and your email so I can reach the winner.  If you'd prefer, send your comments to me by email.   Enter once or enter with all the possible ways! 

Followers of my blog will be entered automatically without a comment necessary!

Limited to US and Canada mailing address and must be over 18 years old.  Winner will be selected on May 7th and announced on my blog!  Revisit on May 7th to see the winner!


1.  Browse Adornyourself Shop on Etsy and mark your favorites with a "heart" and leave a comment about items you like.
2.  Browse Adornyourself on Flikr and comment on your favorite photos.
3.  Post a link on YOUR site to this Giveaway to spread the word, and comment below with your site link so I can visit you!

Have fun and Good Luck!  I've enjoyed introducing you to designer and artist Kathy McDonald and it was a pleasure to show off her pottery and jewelry!


Pottery Pie Plate Baking Dish by Adornyourself

Apr 8, 2011

New Free Tutorial - Zebra Stripe Copper Post Earrings by York Avenue Studio

New Free Tutorial!  Zebra Stripe Copper Post Earrings by York Avenue Studio


Zebra Stripe Copper Earrings by York Avenue Studio


This tutorial is a follow up to the Tutorial for Zebra Stripe Polymer Clay Cane.  Using the zebra cane slices, you can make these animal print earrings!


Zebra Stripe Copper Post Earrings by York Avenue Studio

Recycled copper circle earrings with bold black and white zebra print, handmade with my own original design. I created a zebra pattern with polymer clay and used slices of a reclaimed copper tube to fashion these gorgeous post stud earrings. Great care was taken to polish the clay to shine like gemstones and the pattern continues through the back of the earrings, which means there is no skin contact with the copper!

The tiny circles are ½ in diameter and the posts are sterling silver with comfort backings. Each earring weighs 1.5 grams, nice lightweight yet solid sturdy design.

I have these for sale in my Etsy Shop, but for those fellow crafters that follow me, here are the steps to make a pair for yourself!

Materials for Zebra Stripe Copper Earrings
The photo above shows what I started with:

1.  Zebra print polymer clay, which you only use 4 slices
2.  Extra clay, junk clay, enough to fill the copper circle
3.  2 copper tube slices - I will tell you how I made mine in a second...
4.  Sterling silver posts and backings
5.  The greatest tool - a toothpick!
6.  Sandpaper - 400grit, 600grit, 1200grit, 2000grit
7.  Dremel rotary tool with polishing wheel

I started by slicing my copper tubing.  I had saved this 6 foot piece when we had a new dishwasher installed, it was the water line and was tossed out to the curb.  I grabbed it for "someday" and stored it.  I used a little handheld pipe cutter from Lowe's working with leather gloves.  I sanded the edges smooth.


The ridges shown on the sides of the copper in the later photos is my inexperience with cutting pipe.  The tool cuts a groove and as the tool is wound around the pipe, I tightened it and went around again, tighten and around, etc. until the pipe is cut through.  My groove was off a bit, well alot and made several grooves, but eventually cut clean though!  I actually like the "stripes" because they match well with the zebra theme!

Next, I rolled the spare clay (brown) into a log that would fit the center of the circle and with the copper circle flat on the table, smashed the clay down to the bottom, leaving spare above the top rim.  I took the sterling silver earring post, mine has a ball and loop, and pressed it into the clay on the bottom until the ball and loop sunk enough and then covered it with clay, using the toothpick as a roller.  Then, I turned the copper ring on the side and sliced the clay on the top rim flush and flat.  The baked clay will hold the post in place.

The zebra slice is then centered over the post and pressed thru and down to rest on the back.  Trim the spare clay to leave a nice circle on the backside.  For the front, the zebra slice is pressed on and trimmed.

I baked mine at 265 degrees for 25 minutes and let cool.

Sand with 400grit, then 600grit, then 1200grit and 2000grit.  Finish up with the dremel tool.


Zebra Stripe Copper Earrings by York Avenue Studio

I really love the contrast of the zebra to the copper metal.  These are so fun to make and done in no time.  I hope you enjoy the tutorial and spread the word to family and friends who enjoy handmade jewelry.


Kathy


Apr 3, 2011

NEW! Tiny Kitty Moon and Shore Necklace by York Avenue Studio

Below is a photo I took one morning on a walk at the shore, just down the road from my home.  The New York skyline isn't in this frame, but just off to the right.  I'll add that photo in a minute......
photo by York Avenue Studio - Jersey Shore Beach - "Treasure Strewn"

My inspiration for this necklace started at the beach. I live on the Jersey Shore and on my morning walks I see the long line of treasures that are left on the sand after the tide goes out. I wanted to make a necklace that represented the beautiful assortment of “finds” from the ocean.


The focal is a tiny kitty sitting on a crescent moon that I made with black and white polymer clay, polished to shine like a gemstone. The moon is antique brass wire that I hardened by hammering and the kitty slides on the wire. At the top of the pendant is a cherry pink quartz and pearl flower with a turquoise blue howlite gemstone drop.


I selected some beads that were the colors and shapes best suited to make what I had in mind and then literally scattered them on my bead mat to imitate how the waves would leave rocks and shells on the sand.  That was fun!  I walked away for a bit, came back, and still liked it!  If you've made jewelry, then you might know what I'm talking about.  Sometimes, when going back to a project, you say to yourself, "What was I thinking!"  This was one of the good times when I was still onboard with the design, so I got to work on the assembly!


Along with the white and black genuine pearls and the Swarovski crystal beads, I’ve tucked in some little treasures: Purple Iolite gemstones, copper moon/dream charms, Abalone shell, brass links and a hand-beaded star with black pearl center.


It's exactly what I was hoping for!  Eclectic, bold, sparkly and to me, wonderful!


Tiny Kitty Moon and Shore Necklace by York Avenue Studio

Tiny Kitty Moon and Shore Necklace by York Avenue Studio


I think this would make a perfect gift for a fellow cat lover, an art teacher or someone who enjoys the ocean shore!

I'd love to hear what your reaction is and whether you love it or hate it!  Leave a comment, please!

Lastly, here is the photo with the NYC skyline, tiny, but follow the end fence post up with your eyes and just on the horizon you'll start to see the bridge, buildings, etc.  Not bad from Jersey!  (Click the photo - larger view)

photo by York Avenue Studio - Jersey Shore - "Wood Fence Post"

Mar 22, 2011

3rd Place Winner! Metal Clay Heads: March Challenge - The Elements

Earth Goddess Amulet by York Avenue Studio
The voting is Closed - My Earth Goddess was voted ito 3rd Place!

The Etsy team Metal Clay Heads has a Challenge every other month with a selected theme and technique for members to create beautiful metal clay designs and the submissions are posted on our blog for everyone to vote!

Metal Clay Heads: March Challenge - The Elements: "Our theme this time is The Elements - Water, Fire, Wind and Earth. The required technique is using syringe or snakes when creating the desig..."

Here is how I created my entry into this Challenge:

Sketch up of idea as the design hit me initially
Maybe it was the oncoming of the full moon, but this idea just "hit" me and I grabbed a pen and the first paper I could find, which was the back of an envelope on the counter!  I wanted to create a special pendant for myself to wear daily, something sturdy and smooth, something that wouldn't jab my son when he jumped up on my lap and hugged me!

I recently lost my dad, less than two weeks ago.  He was in hospice in MI with just days to enjoy and I'm in NJ and didn't get there in time.....big misfortune and lost opportunity.

I also recently lost my doggy, about a week prior, and missing her hour by hour, still "hearing" her in the background only to re-realize she's not here.

Trying to stay positive has been tough lately, and these last events plus more....well, I decided to focus on what I have that is good and appreciate it.

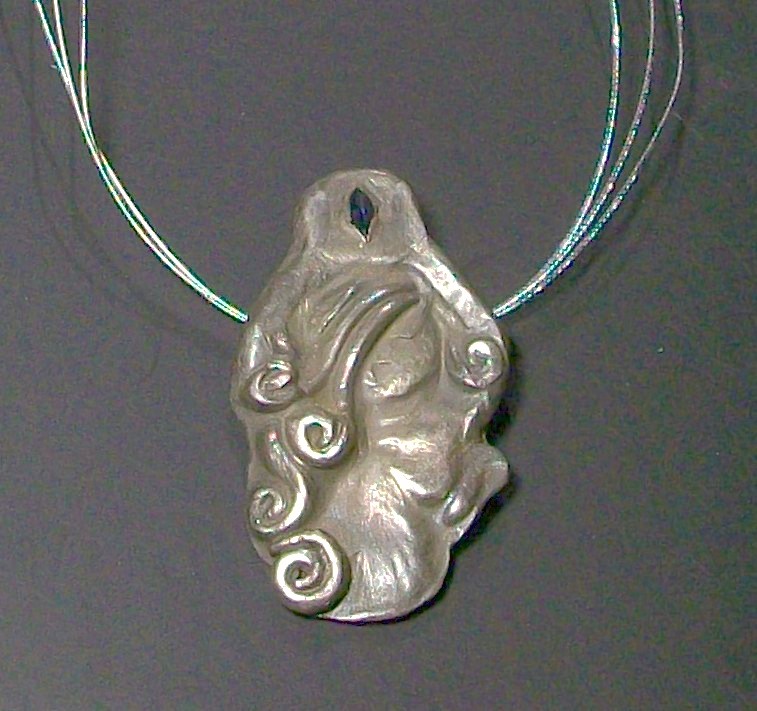
This amulet represents the Earth Goddess, which to me means Motherhood.  I have 5 amazing children and I am surrounded by their love, which IS my life!  The swirls on this pendant would represent them.  In my final design, I used 5 spirals in her hair and on the back, I enscribed each child's Zodiac symbol for the month they were born.

The Blue Sapphire in the round moon being held high represents focus, protection, devotion and awareness:
"When misfortune is anow, wear the Blue Star on thy brow"

I made her face joyous, with eyes closed because that is how I laugh when I am with my kids, sometimes laugh so hard I'm in tears!


Earth Goddess Amulet with Blue Sapphire by York Avenue Studio

I used a rainbow patina on this pure silver pendant, but kept some areas shiny silver.  On the moon, there is a waxing crescent moon on the left highlighted in silver and also a waning moon on the right. 


The Earth Goddess Amulet Pure Silver by York Avenue Studio
I designed the pendant to hang so that the arms would stretch above the cord and hold the moon and star high.

I love my new necklace and haven't taken it off since I made it!

I hope you enjoyed this post and I'm so glad to share this story behind the scenes!
Kathy

Feb 28, 2011

Free Tutorial - Zebra Cane in Polymer Clay by York Avenue Studio

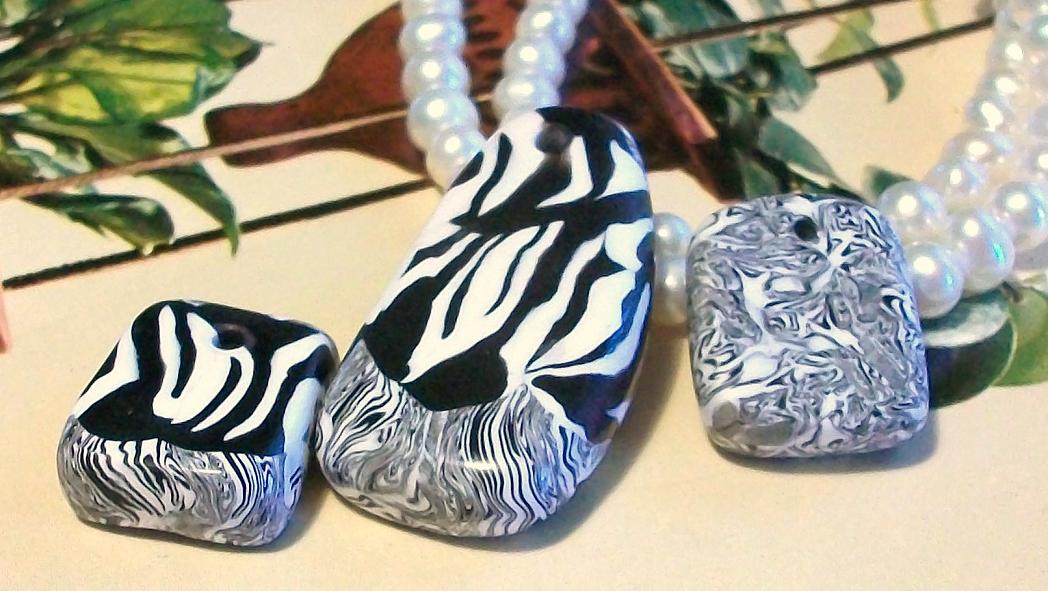
Zebra Cane Beads by York Avenue Studio


I find it amazing that something so gorgeous and in demand, like a Zebra Cane Tutorial, is very hard to find on the internet!!  There are some zebra canes pre-made for sale, beads for sale made from canes, and for a fee, you might find access to a tutorial, maybe.

I started to think that maybe there is a conspiracy amidst the polymer-clay-ers not to share the zebra without membership.  Hmm.  I am new to polymer clay and must be over-thinking this....

Well, I'm going to post a Free Tutorial for a Zebra Cane in Polymer Clay, no coupon code needed, no membership fee or registration!

After having so much fun making my first cane ever recently, I decided I wanted to try a Zebra Cane.  Since there wasn't a free tutorial to be found, I delved in and made one up!  Maybe it was beginner's luck?  It worked!

I hope you enjoy this tutorial and have great success making Zebra Canes in polymer clay!

By the way, if you happen to find another tutorial for Zebra Canes that is free online, leave a comment!  I'm still thinking there must be a "silence pact" so we newbies have to pay to join in!  Actually, I've found the polymer clay community very friendly and warm, so please don't pay any mind to my suspicions.

Simple Zebra Cane Tutorial for Polymer Clay by York Avenue Studio

With the Zebra Cane, you will be stacking layers that are equal in length with different widths.  The overall width of the stack will determine how long your stripes will be.  I made a simple, easy Zebra but you can make an elaborate Super Zebra with these basics, then add your own creativity.

Simply stacking layers of alternating black and white will give you a bar code stripe, not very much like a Zebra, but a nice general start.  This is what I had in mind when making this cane.  I kept it simple with some variations.

1.  Condition some white and black polymer clay and divide into lumps.  I use Premo brand and knead the clay in my fingers.  I am only making a small cane so I used a small amount of clay.  Divide an almost equal amount of each color into lumps, as each black lump will be a stripe and each white lump will be a stripe.  Make several, depending on your style preference.  I like bigger black stripes, you might like thinner black and larger white, etc.


2.  I start out with one black lump and roll a log.  The length will be the cane length.  Then flatten the log, not perfect, as stripes tend to be wider then thinner.  The flattened piece is the length and width of your cane.  If you want it longer or wider, adjust now.  I made a short, skinny cane because I was testing the method.  I've learned that once you make a great cane, you wish it was bigger!  This one was great but ran out fast!

In the photo below, I've made the first flattened black piece.  I've also started a second black piece, which brings us to the next step.


3.  Make a second black log about the same size as the first and flatten.  Try to make them at least the same length.  I ended up trimming mine to match.  Lift the second piece and place it on the first, lined up length wise with the first piece, but off center about 1/3 of the width.  Some of the strip will overhang on one side. Don't press yet.

4.  Make a white log the same length as the black strips and flatten.  Lift the top black layer holding the edge hanging over, leaving the other edge attached to the first layer.  (It will look like an upside down capital T.)  Take the white layer and line it up length wise with the black layers on the side you are lifting.  The white layer goes on top of the first black layer.  When the top black layer is placed back down, it should cover the white layer.  Any clay that hangs over can be trimmed off and used later.


First black layer with second black layer lifted up, like upside down T


White layer gets tucked beneath the two black layers
5.  Another white layer goes across the top, full length and width of stack.

6.  Another black layer goes across the top, full length and width of stack.

7.  I added a black layer on top of the last black layer and tucked another white layer between, just like steps 3 & 4.

Once you are finished layering your stripes, then trim the extras on all four sides and shape the stacked sides nice and flat, working the layers gently so they are pressed together.

Time to slice and see your creation!

I used the extras and lined them up length wise and rolled them into a log, folded the log length wise and rolled again into a log.  This junk cane actually turned into a nice coordinating mini zebra pattern that I used to fill in spots on my beads.  It almost looks like a Toile pattern on the back.

To make my beads, I used some junk clay as a core and used slices from my Zebra cane to cover the outside.  I positioned the slices just so which helped the pattern appear to continue on.  I used my fingers to work the slices together and a round toothpick as a mini roller to smooth the seams.


Zebra Cane Beads by York Avenue Studio


Zebra Cube Charm Necklace by York Avenue Studio - Front
Zebra Cube Charm Necklace by York Avenue Studio - Back
Zebra Stripe Copper Post Earrings by York Avenue Studio


Kathy