Showing posts with label copper. Show all posts

Nov 15, 2012

In the Dark, I Saw a Cat Pendant


Tiny Kitty hand sawed in copper by York Avenue Studio

In the aftermath of Superstorm Sandy, we were left in the dark.  Thankfully, we were just far enough from the Jersey Shore to escape the flooding (3 houses away!) but we were without power for 8 days.  After the sun went down, there was little to do and we settled into a pattern of going to bed earlier than normal.  When everyone was tucked in, I found some peaceful creative time, working at my bench by a camping lantern.


I was struck with the urge to "saw" something in the dark!  I cut a circle from some copper sheet and drew a cat with a black sharpie.  I punched a hole in the center and started my little pierced project.

The process of sawing a tiny design is very relaxing and stress relieving.  Staying calm and keeping the tension smooth and steady is important for good results, plus it benefits the "soul" to release pressure and have something creative to focus on, perfect remedy considering the circumstances.

Copper Cat Necklace by York Avenue Studio

I finished the design, cleaned it up and polished the copper.  I matched the pendant up with a sterling silver box chain that is plated in 14K Rose Gold and a handmade bail.  A little treasure that I have as a keepsake to remember the "calm" after the storm.

Feb 24, 2012

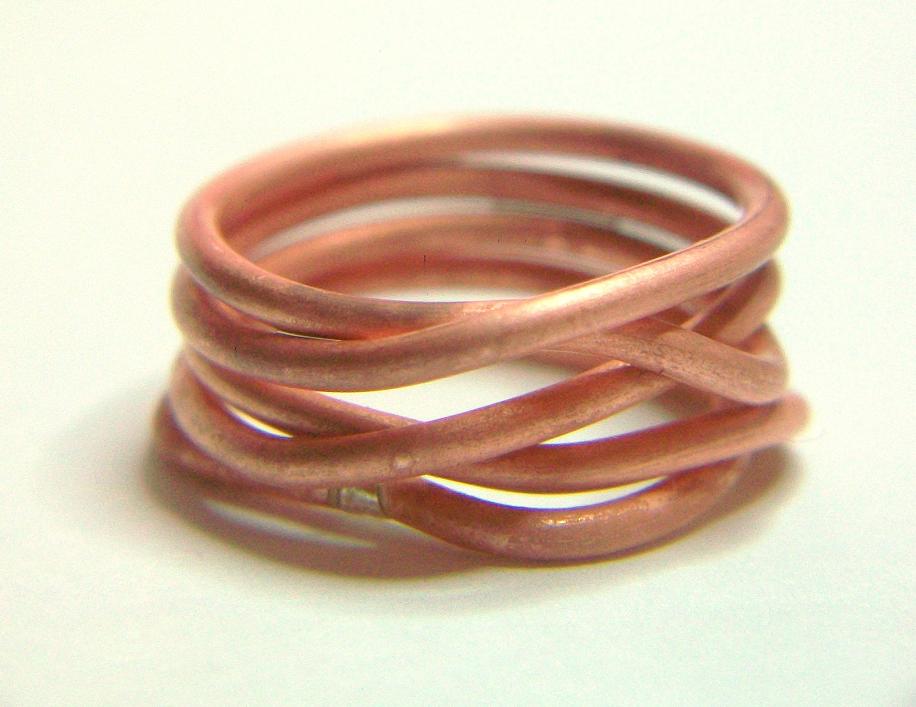
Bold Copper Weave Stack Ring Tutorial How To

Copper Weave Stack Ring by York Avenue Studio
This statement ring looks like woven rings of bold copper and has an impressive wide band.  Comfortable for ladies as well as gents, this ring is easy to make with a few tools and basic metal skills.  I decided to share my steps in making this ring.  Feel free to make one for yourself.

I start with about 12 inches of copper wire, round 14 gauge.  Flush cut the ends and sand flat.  Place the wire centered on a ring mandrel at the size you want your ring, maybe a little smaller.  The ring will get larger with hammering at the end and you can size it right then.  I’m making this ring a size 8, so I use the size 7 on the mandrel.
I wrap both sections, right and left, around the back of the mandrel, crossing in the middle and stop.  Flip the mandrel so the cross section is facing me, this is now the front.
The wire that is at the bottom that crosses up over the top wire, this will be the first wire to work with.  Continue with this wire around the mandrel along the top edge of the wire back to the front, stopping before reaching the front center. 
I bring the second wire up to cross under the top wire.  The wires will only cross in the front and line up in rows in the back.  The cross overs in the front will alternate.  Continue until you use up the wire, watching for the last completed row where the ends will still meet.  Trim the ends to meet, preferably in the back of the ring.
Using pliers, line up the ends to touch and solder the joint.  I left the solder joint silver, but copper color solder can also be used.  Using a patina or pickle that is contaminated also will “plate” the joint more like copper color.
Return the ring to the mandrel and reform the bands with a rawhide mallet, shape the ring, line up the bands.

If the size is too small, hammer it larger. I use a steel hammer to make a hammered texture with facets.
Tumble with shot to polish and work harden the ring.  Patina to darken or keep it shiny.  Protect the finish with Ren Wax which also weatherproofs the ring.
The final ring has such smooth lines, nice texture and the pattern is nice for a subtle chic everyday ring.

If you make one, let me know, I'd love to see your photos, too!
Kathy

For another amazing copper ring tutorial, please visit my Etsy shop for the instant download PDF to make a Copper Ball Love Knot Friendship Ring by York Avenue Studio

https://www.etsy.com/listing/83350862/tutorial-pdf-wire-wrapping-copper-ball?ref=shop_home_active_14


May 17, 2011

Treasure in My Mail Box by York Avenue Studio

Copper Clay Heart and Porcelain Cabs by Adornyourself
I was super excited to see a package in my mailbox from Kathy McDonald of Adornyourself!  She very thoughtfully sent me a little gift pack for hosting her Giveaway recently! Thank You!  It was my pleasure!

The adorable Copper Heart pendant is stamped with antiqued detail!  I absolutely love it!  The cabs are circles and hearts and a square in porcelain with engravings and gorgeous glazed colors!  I can't wait to use these in future designs!  They are even more amazingly beautiful in person!

There are times that I am feeling a little uninspired, but having great friends that make jewelry and understand the good and the bad, people to share stories with and share projects with......these fellow artists and designers just know what to do or say to offer encouragement and bring the wind back into my sails!

Thank you, Kathy, for the lovely gift!  And thanks to all my followers for your support and for being "out" there for me!
Kathy

Copper Clay Heart Pendant and Porcelain Cabs with Gorgeous Glazes by Adornyourself!

Apr 8, 2011

New Free Tutorial - Zebra Stripe Copper Post Earrings by York Avenue Studio

New Free Tutorial!  Zebra Stripe Copper Post Earrings by York Avenue Studio


Zebra Stripe Copper Earrings by York Avenue Studio


This tutorial is a follow up to the Tutorial for Zebra Stripe Polymer Clay Cane.  Using the zebra cane slices, you can make these animal print earrings!


Zebra Stripe Copper Post Earrings by York Avenue Studio

Recycled copper circle earrings with bold black and white zebra print, handmade with my own original design. I created a zebra pattern with polymer clay and used slices of a reclaimed copper tube to fashion these gorgeous post stud earrings. Great care was taken to polish the clay to shine like gemstones and the pattern continues through the back of the earrings, which means there is no skin contact with the copper!

The tiny circles are ½ in diameter and the posts are sterling silver with comfort backings. Each earring weighs 1.5 grams, nice lightweight yet solid sturdy design.

I have these for sale in my Etsy Shop, but for those fellow crafters that follow me, here are the steps to make a pair for yourself!

Materials for Zebra Stripe Copper Earrings
The photo above shows what I started with:

1.  Zebra print polymer clay, which you only use 4 slices
2.  Extra clay, junk clay, enough to fill the copper circle
3.  2 copper tube slices - I will tell you how I made mine in a second...
4.  Sterling silver posts and backings
5.  The greatest tool - a toothpick!
6.  Sandpaper - 400grit, 600grit, 1200grit, 2000grit
7.  Dremel rotary tool with polishing wheel

I started by slicing my copper tubing.  I had saved this 6 foot piece when we had a new dishwasher installed, it was the water line and was tossed out to the curb.  I grabbed it for "someday" and stored it.  I used a little handheld pipe cutter from Lowe's working with leather gloves.  I sanded the edges smooth.


The ridges shown on the sides of the copper in the later photos is my inexperience with cutting pipe.  The tool cuts a groove and as the tool is wound around the pipe, I tightened it and went around again, tighten and around, etc. until the pipe is cut through.  My groove was off a bit, well alot and made several grooves, but eventually cut clean though!  I actually like the "stripes" because they match well with the zebra theme!

Next, I rolled the spare clay (brown) into a log that would fit the center of the circle and with the copper circle flat on the table, smashed the clay down to the bottom, leaving spare above the top rim.  I took the sterling silver earring post, mine has a ball and loop, and pressed it into the clay on the bottom until the ball and loop sunk enough and then covered it with clay, using the toothpick as a roller.  Then, I turned the copper ring on the side and sliced the clay on the top rim flush and flat.  The baked clay will hold the post in place.

The zebra slice is then centered over the post and pressed thru and down to rest on the back.  Trim the spare clay to leave a nice circle on the backside.  For the front, the zebra slice is pressed on and trimmed.

I baked mine at 265 degrees for 25 minutes and let cool.

Sand with 400grit, then 600grit, then 1200grit and 2000grit.  Finish up with the dremel tool.


Zebra Stripe Copper Earrings by York Avenue Studio

I really love the contrast of the zebra to the copper metal.  These are so fun to make and done in no time.  I hope you enjoy the tutorial and spread the word to family and friends who enjoy handmade jewelry.


Kathy