Showing posts with label scrolls. Show all posts

Mar 22, 2011

3rd Place Winner! Metal Clay Heads: March Challenge - The Elements

Earth Goddess Amulet by York Avenue Studio
The voting is Closed - My Earth Goddess was voted ito 3rd Place!

The Etsy team Metal Clay Heads has a Challenge every other month with a selected theme and technique for members to create beautiful metal clay designs and the submissions are posted on our blog for everyone to vote!

Metal Clay Heads: March Challenge - The Elements: "Our theme this time is The Elements - Water, Fire, Wind and Earth. The required technique is using syringe or snakes when creating the desig..."

Here is how I created my entry into this Challenge:

Sketch up of idea as the design hit me initially
Maybe it was the oncoming of the full moon, but this idea just "hit" me and I grabbed a pen and the first paper I could find, which was the back of an envelope on the counter!  I wanted to create a special pendant for myself to wear daily, something sturdy and smooth, something that wouldn't jab my son when he jumped up on my lap and hugged me!

I recently lost my dad, less than two weeks ago.  He was in hospice in MI with just days to enjoy and I'm in NJ and didn't get there in time.....big misfortune and lost opportunity.

I also recently lost my doggy, about a week prior, and missing her hour by hour, still "hearing" her in the background only to re-realize she's not here.

Trying to stay positive has been tough lately, and these last events plus more....well, I decided to focus on what I have that is good and appreciate it.

This amulet represents the Earth Goddess, which to me means Motherhood.  I have 5 amazing children and I am surrounded by their love, which IS my life!  The swirls on this pendant would represent them.  In my final design, I used 5 spirals in her hair and on the back, I enscribed each child's Zodiac symbol for the month they were born.

The Blue Sapphire in the round moon being held high represents focus, protection, devotion and awareness:
"When misfortune is anow, wear the Blue Star on thy brow"

I made her face joyous, with eyes closed because that is how I laugh when I am with my kids, sometimes laugh so hard I'm in tears!


Earth Goddess Amulet with Blue Sapphire by York Avenue Studio

I used a rainbow patina on this pure silver pendant, but kept some areas shiny silver.  On the moon, there is a waxing crescent moon on the left highlighted in silver and also a waning moon on the right. 
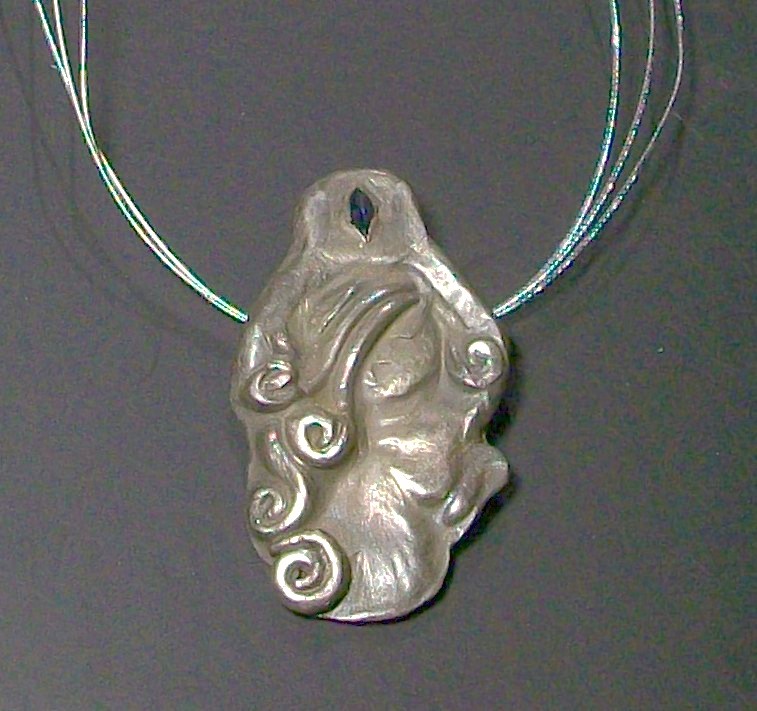


The Earth Goddess Amulet Pure Silver by York Avenue Studio
I designed the pendant to hang so that the arms would stretch above the cord and hold the moon and star high.

I love my new necklace and haven't taken it off since I made it!

I hope you enjoyed this post and I'm so glad to share this story behind the scenes!
Kathy

Feb 25, 2011

Pearly Sea Scrolls Necklace - My First Attempt at Polymer Clay Beads

First Beads made with First Polymer Cane

I am speachless!  Seriously, I had no idea polymer clay could be sanded and polished.  I was always turned off by the matte finish, the imperfections, the "dollar store" look of anything I had dabbled in.  I made pen covers with the kids that were fun as a craft.  No idea that it wasn't done and the finishing would bring the piece to life.

I'd seen shiny polymer pieces, cute little mini food, cupcakes, fruits, but thought they were just dipped in clear polish.  I even saw tutorials on what gloss to dip them in and about air bubbles, etc.  I wasn't interested.

I am shocked and super excited!  I am experienced with polishing silver jewelry settings and know how to be maticulous and patient and get high shine results in my metal jewelry.  I had a pre-concieved notion that if I sanded polymer clay, it would be scratched, like sand paper on a formica counter or a scratch in plexiglass.

I am so eager to show off my first polymer pieces made from my first ever cane!  As I sanded the pieces, I felt the smoothness right away, but also saw the dull, powdery look and wasn't sold yet that this would be what I wanted.  I went from 400 grit to 600 grit to 1200 grit to 2000 grit.  Very smooth feel to the pieces, but not pretty looking.

Then it happened!  I plugged in my rotary tool and started to buff.  Voila!  Each piece became so shiny as if it was wet!  Wow!  I love it!  I also see where my sanding wasn't complete and my forming of the piece in the smushy clay stages shows my inexperience with blending seams.  But, I've polished rocks in my tumbler in the past and the natural imperfections looked just the same after polishing, like creases and crevices in rock.  Rock tumbling takes 4 weeks to polish, and I only spent about an hour on the clay beads!


Pearly Sea Scrolls Necklace by York Avenue Studio
Here is my creation with my new shiny polymer clay beads!  I really love the white swirls outlined in black.  The navy blue and brown swirls show better in person.  This design idea would look great with a nice navy suit and white blouse!  Black suit, brown suit, gray........


Pearly Sea Scrolls Necklace by York Avenue Studio


In my design I've added silver spacers around the pendant hole and at the top and bottom of the cylinder beads.  The bail is wire wrapped and hooks from back to front with a button half drilled pearl as a stopper.  I used freshwater pearls to string the necklace.  I really like the little connector that the pendant hangs from.  I stamped the back with my new logo stamp from the Charm Factory!


Pearly Sea Scrolls Necklace by York Avenue Studio


All this time these parts and supplies were just sitting in my craft boxes and just a bit of inspiration from my blogging friends, I was able to make a beautiful necklace for myself at no cost!  Amazing!

Hope you like my first challenge with polymer clay.  I'd love to hear your comments!
Kathy